
@mudiera_admin
Mudiera Admin
Bio
Welcome to Mudiera im Admin Ask me if you need any help
Creator Snapshot
Mudiera Official
Why Mudiera: Admin
Availability: Open to collaborations
Content Niches
Collaboration Preferences
Social Links
Activity
Blogs: 14
Reviews: 2
Recommendations: 3
Blog Posts

Stripe Setup for Business Profiles: from onboarding to payout
1. Mudiera uses Stripe-hosted onboarding. You enter business and payout details directly in Stripe.

Business Onboarding Tutorial: create your business profile (get listed)
Business onboarding Set Up Your Business Profile For business owners: your Mudiera profile helps customers find you, contact you, and book you. Think of it as your mini‑website inside Mudiera — built for mobile and designed to convert. How to start (new users vs existing users) Account menu / Sidebar 1 New user: sign up first You need an account before you can create a business profile. Option A: Open the account menu → tap Sign up . Option B: Open the sidebar menu (burger) → tap + Business Profile . 2 Existing user: upgrade to a business profile Open the account menu or sidebar and tap + Business Profile . You’ll be taken to business setup, then into your business dashboard. Business profile setup (complete these in order) Profile setup Do profile setup first. Once the basics are complete and clear, move on to Apps (plugins). 1 Business name + category Choose a clear name and the closest category so customers can find you in search and discovery. 2 Business email + contact Use an email you check (important for customer messages and important account updates). 3 Location / postcode + service area Set your location so nearby customers see you first. Mention any service area (delivery / mobile service). 4 Description (make it convert) Write a short description that clearly shows who it’s for, what you offer, and how to book. Format: who it’s for → what you offer → how to book 5 Branding: logo + cover Upload a clean logo and a bright cover image. This is the fastest way to look trustworthy. 6 Save Tap Save . Your profile is now ready for customers and ready for plugins. Business dashboard sections (what each one does) Dashboard → Business 1 Profile Edit your name, category, description, images, and public details. 2 Payment Connection (Stripe) Required for paid bookings and product orders. Look for Payment Connection → Start / Continue Stripe setup . 3 Messages Reply to customers quickly. Fast replies increase bookings and trust. 4 Analytics See what customers click and improve your listing (photos/headline/description) based on data. Next: Apps (add a plugin) Apps Apps are plugins you enable depending on how you operate. Turn on only what you’ll actually use this week. Bookings — customers reserve time slots/services. Products — sell items and manage orders. Careers — post jobs and manage applications. Offers — publish promotions/deals. Spotlight — boost visibility for launches/peak weeks. Reminder: If you enable paid plugins, connect Stripe first.

Events and clubs: RSVP, join, and participate
Events & Clubs Connect with the community through events and clubs. Whether you want to attend something this week or join a group long‑term, this page shows you where to start. Events Find → Open → Book Events are the easiest way to discover what’s happening nearby. Use filters to narrow down what you want, then open an event to see full details before you book. 1 Open Events Open Events from the main navigation. 2 Filter by date and category Filter by date and category to quickly find what fits your schedule. Tip: start with a broad filter (this weekend / this month), then narrow down. 3 Open an event for details Tap an event to see the full details (location, time, requirements, and who it’s for). 4 Book or RSVP Tap Book or RSVP to secure your spot. If you’re not ready, save the date and come back later — popular events can fill up. Clubs Pick → Join Clubs are for ongoing community—groups you can join to meet people, share interests, and stay in the loop. 1 Open Clubs Open Clubs from the main navigation. 2 Pick a club Choose a club that matches your interests. Tip: check the club description for activity level and what kind of events they run. 3 Join Tap Join to become a member. Once you join, you’ll usually see updates, discussions, and upcoming meetups in one place. What it looks like Here’s a quick preview of the events and clubs on the profile page screen:

Business tutorial: sell products and manage orders
Products & Orders If you sell products, Mudiera helps customers buy and helps you track orders. Set up a few products first, then manage everything from your dashboard as orders come in. Add products Dashboard → Business → Products Start with your best‑selling items. Clear photos and a simple description usually convert better than long text. 1 Open Products Go to Dashboard → Business → Products . 2 Add a product Tap Add product . 3 Fill in the details Add the name, price, description, and photos. Tip: use 1 strong “main photo”, then add close‑ups or variations as extra images. 4 Publish Publish the product so customers can buy it. Orders Track from Dashboard Once products are live, new orders will appear in your dashboard. Keep statuses up to date so customers always know what’s happening. Track new orders from your dashboard as they come in. Update the status as you process and ship (this helps reduce “any updates?” messages). Message customers when needed for delivery details, custom requests, or delays. Tip: if something changes, a quick message builds trust and usually prevents cancellations.

Business tutorial: turn on bookings and manage availability
Bookings Bookings help customers reserve time instantly and reduce back‑and‑forth messaging. Once your booking types and availability are set, customers can request the right service at the right time—without waiting for replies. Set up bookings Dashboard → Business → Bookings Start by creating a few booking types. Keep them simple and specific—this makes it easier for customers to choose the correct option. 1 Open the bookings screen Go to Dashboard → Business → Bookings . 2 Create a booking type Add a booking type (for example Haircut or Consultation ). Tip: name it the way a customer would say it out loud (short and clear). 3 Add details Add the duration, price, and any notes (for example what to bring, or what’s included). 4 Publish Publish your booking type so customers can start requesting it. Add time slots After your booking types are ready, set your availability. This is what determines which days and times customers can choose from. Set weekly availability: for example, Mon–Fri, 10–6. Keep your default schedule realistic—customers will book the earliest open slot. Block off holidays and unavailable days: so no one books when you’re away. If you’re taking a break, block it early—this avoids rescheduling headaches later. Keep pricing and duration consistent: the booking form should match what happens in real life. Consistency reduces cancellations and last‑minute “how much will it be?” messages. Handling cancellations Use a clear policy so customers know what to expect. The best policies are short, friendly, and easy to find. Include: How late someone can cancel (for example “up to 24 hours before”) Whether deposits are refundable (and what happens if they no‑show) Tip: place the policy inside the booking notes so it’s visible at the moment they choose a time.

Business tutorial: promote your listing (reviews, spotlight, analytics)
Grow Your Business Use trust signals and data to grow consistently. The goal is simple: make it easy for customers to choose you, then improve one thing at a time based on what’s working. Get more bookings Small habits compound. These three changes usually have the biggest impact on bookings and conversions. Reply quickly in messages. Customers often book whoever responds first. Tip: even a short “Yes — I can help. What day works?” keeps momentum. Keep photos updated. Fresh photos make your business feel active and trustworthy. Add recent work, seasonal offers, or a new cover image once in a while. Encourage happy customers to leave reviews. Reviews are one of the strongest trust signals. Ask right after a successful booking—when they’re most likely to say yes. Spotlight Running a campaign or promoting a new service? Use Spotlight to feature your business and bring in new traffic. Best times to use Spotlight: A new service launch, a seasonal promotion, filling empty slots, or announcing a limited offer. Tip: keep the offer simple and clear—one message, one action. Analytics Analytics help you stop guessing. Look for patterns in what customers interact with, then make one improvement at a time. Check what customers click most. This shows what they care about (services, photos, booking, contact). Update your headline and photos based on what performs best. If customers spend time on photos, add more examples. If they click booking, make your booking options clearer. Test one improvement at a time. That way you know what caused the change. Example: change your headline this week, update photos next week, then compare results.
Write a blog post + paste images — step by step
Creating Blog Posts Blogs are perfect for tutorials, announcements, and community stories. This guide shows how to create, edit, and delete posts—plus a few safe HTML examples you can paste into the editor. Create Dashboard → Posts Creating a post takes less than a minute. Start from your dashboard, add a title, then write in plain text or HTML. 1 Open Posts Go to Dashboard → Posts . 2 Create a new post Tap Create Post . 3 Add a title (and optionally a cover image) Add a Title and an optional Cover Image . 4 Write your content Write content using plain text or HTML. For a clean “tutorial” feel, use headings, short paragraphs, and spacing blocks (cards/surfaces). 5 Paste images directly Paste an image into the editor — it uploads automatically and inserts an <img> tag for you. 6 Publish Tap Publish Post . HTML examples Want your post to feel more like a tutorial? Use headings, short paragraphs, and lists. Here’s a simple starter template you can copy and paste: <h2>My headline</h2> <p>One short paragraph that explains the post.</p> <ul> <li>Bullet 1</li> <li>Bullet 2</li> </ul> <p><img src="https://..." alt="" /></p> Tip: you don’t need backticks around image URLs — just use https://... . Simple icons (SVG) You can also add small icons inside your blog posts using simple inline SVG. This works well for tutorials—icons help readers scan steps quickly without turning the post into a wall of text. Use a small size (16–18px) and a soft grey stroke for a Lucide‑style look. Here’s a “Home” icon example: <p> Open Mudiera from your home screen <svg viewBox="0 0 24 24" width="16" height="16" fill="none" stroke="#9ca3af" stroke-width="2" stroke-linecap="round" stroke-linejoin="round" aria-hidden="true"> <path d="M3 9.5 12 3l9 6.5V21a1 1 0 0 1-1 1h-5v-7H9v7H4a1 1 0 0 1-1-1z"></path> </svg> </p> If you want the icon to inherit your text color automatically, swap stroke="#9ca3af" for stroke="currentColor" and then place it inside an element that already has a grey text class. For example: <p class="text-gray-500"> Saved to home screen <svg viewBox="0 0 24 24" width="16" height="16" fill="none" stroke="currentColor" stroke-width="2" stroke-linecap="round" stroke-linejoin="round" aria-hidden="true"> <path d="M3 9.5 12 3l9 6.5V21a1 1 0 0 1-1 1h-5v-7H9v7H4a1 1 0 0 1-1-1z"></path> </svg> </p> Note: your sanitizer removes style="" , so use existing classes like text-gray-500 , bg-gray-50/50 , border-gray-100 , rounded-2xl , and p-4 instead. Using existing classes for layout You can make posts look “designed” (without custom CSS) by using the existing utility classes already in your project: Good defaults: Use space-y-4 to add gaps between blocks, mud-surface to create a soft card, and mud-surface-strong for a more prominent panel. For code samples, wrap with: bg-gray-50/50 border border-gray-100 rounded-2xl p-4 overflow-auto Here’s a mini “callout card” you can copy: <div class="mud-surface p-5 space-y-2"> <p class="text-gray-900 font-bold">Tip</p> <p class="text-gray-700"> Keep paragraphs short and use headings so the post reads like a tutorial. </p> </div> Edit Need to fix a typo or update details? You can edit any post you’ve published. Open your post in the dashboard, tap Edit , make your changes, then tap Update Post . Delete If you no longer need a post, you can delete it from the dashboard. Open your post in the dashboard and tap Delete . Deletions are permanent (stored in the database). What the editor looks like Here’s a quick preview of the blog editor screen:

Notifications: enable alerts and test them
Notifications Turn on notifications so you don’t miss important updates. Notifications are especially useful for messages, booking updates, and anything time‑sensitive. Enable notifications Settings → Notifications You only need to do this once. After that, Mudiera can send you important updates when they happen. 1 Open notification settings Go to Settings → Notifications . 2 Enable notifications Tap Enable notifications . 3 Allow permission when prompted When your device asks for permission, tap Allow . If you tap “Don’t allow”, you can still fix it later (see the section below). 4 Send a test notification Send a test notification to confirm everything is working. If you denied permission Don’t worry — you can usually re‑enable notifications from your device or browser settings. Android Open your browser’s site settings, then go to Notifications and allow Mudiera. Path varies slightly by device: Site settings → Notifications. iPhone / iPad On iOS, Mudiera may need to be installed as a PWA first, then allowed in iOS settings (this varies by iOS version). Tip: if you don’t see notification prompts in Safari, install Mudiera to your home screen first. What it looks like Here’s a quick preview of the notification settings screen:

Messaging: contact businesses and manage your inbox
Messaging Messaging helps you ask questions, request quotes, and follow up on bookings. It’s the fastest way to clarify details before committing — and the easiest way to stay in touch after. Start a message From a profile You can message from any business profile (or a user profile). Once a conversation starts, you’ll find it in your inbox later. 1 Open a profile Open a business profile (or a user profile). 2 Tap Message Tap Message to open the chat. 3 Write and send Write your message, then hit Send . Tip: if you’re requesting a quote, include your date/time, location, and what you want done. Inbox tips Your inbox collects all your conversations in one place, so you can follow up easily. Find all conversations under Dashboard → Messages . Not seeing your account menu? Refresh once and ensure cookies are enabled. Some browsers block cookies in private/incognito mode — switching to a normal tab usually fixes it. What it looks like Here’s a quick preview of the messaging screen:
Events and clubs: RSVP, join, and participate
Events & Clubs Connect with the community through events and clubs. Whether you want to attend something this week or join a group long‑term, this page shows you where to start. Events Find → Open → Book Events are the easiest way to discover what’s happening nearby. Use filters to narrow down what you want, then open an event to see full details before you book. 1 Open Events Open Events from the main navigation. 2 Filter by date and category Filter by date and category to quickly find what fits your schedule. Tip: start with a broad filter (this weekend / this month), then narrow down. 3 Open an event for details Tap an event to see the full details (location, time, requirements, and who it’s for). 4 Book or RSVP Tap Book or RSVP to secure your spot. If you’re not ready, save the date and come back later — popular events can fill up. Clubs Pick → Join Clubs are for ongoing community—groups you can join to meet people, share interests, and stay in the loop. 1 Open Clubs Open Clubs from the main navigation. 2 Pick a club Choose a club that matches your interests. Tip: check the club description for activity level and what kind of events they run. 3 Join Tap Join to become a member. Once you join, you’ll usually see updates, discussions, and upcoming meetups in one place. What it looks like Here’s a quick preview of the events and clubs screen:
Bookings: how to book appointments and services
Book a Service Some businesses offer booking directly on Mudiera. If you see available times on a profile, you can book a slot in a couple of taps—no back‑and‑forth needed. Book a slot From a business profile You’ll choose a service, pick a time from the calendar, confirm your details, then pay if the business requires it. 1 Open a business profile Find the business you want and open their profile. 2 Choose a service Choose a service / booking type (for example a consultation or a specific treatment). Tip: if you’re unsure, pick the closest match and add a note—most businesses can adjust after. 3 Select a slot Select an available slot on the calendar. If you don’t see a time you want, check another day—or message the business for alternatives. 4 Confirm your details Confirm your details (time, service, and any notes the business needs). 5 Pay (if required) Pay if required, and you’re done. Some businesses take deposits to reduce no‑shows—this will be shown clearly before you confirm. After booking Once booked, you can always check the status and make changes (if the business allows it). Check your booking status from your dashboard. Need to cancel? If cancellation is allowed, use Cancel from the booking page. Tip: cancel as early as possible—late cancellations may be non‑refundable depending on the business policy. What it looks like Here’s a quick preview of the booking flow:
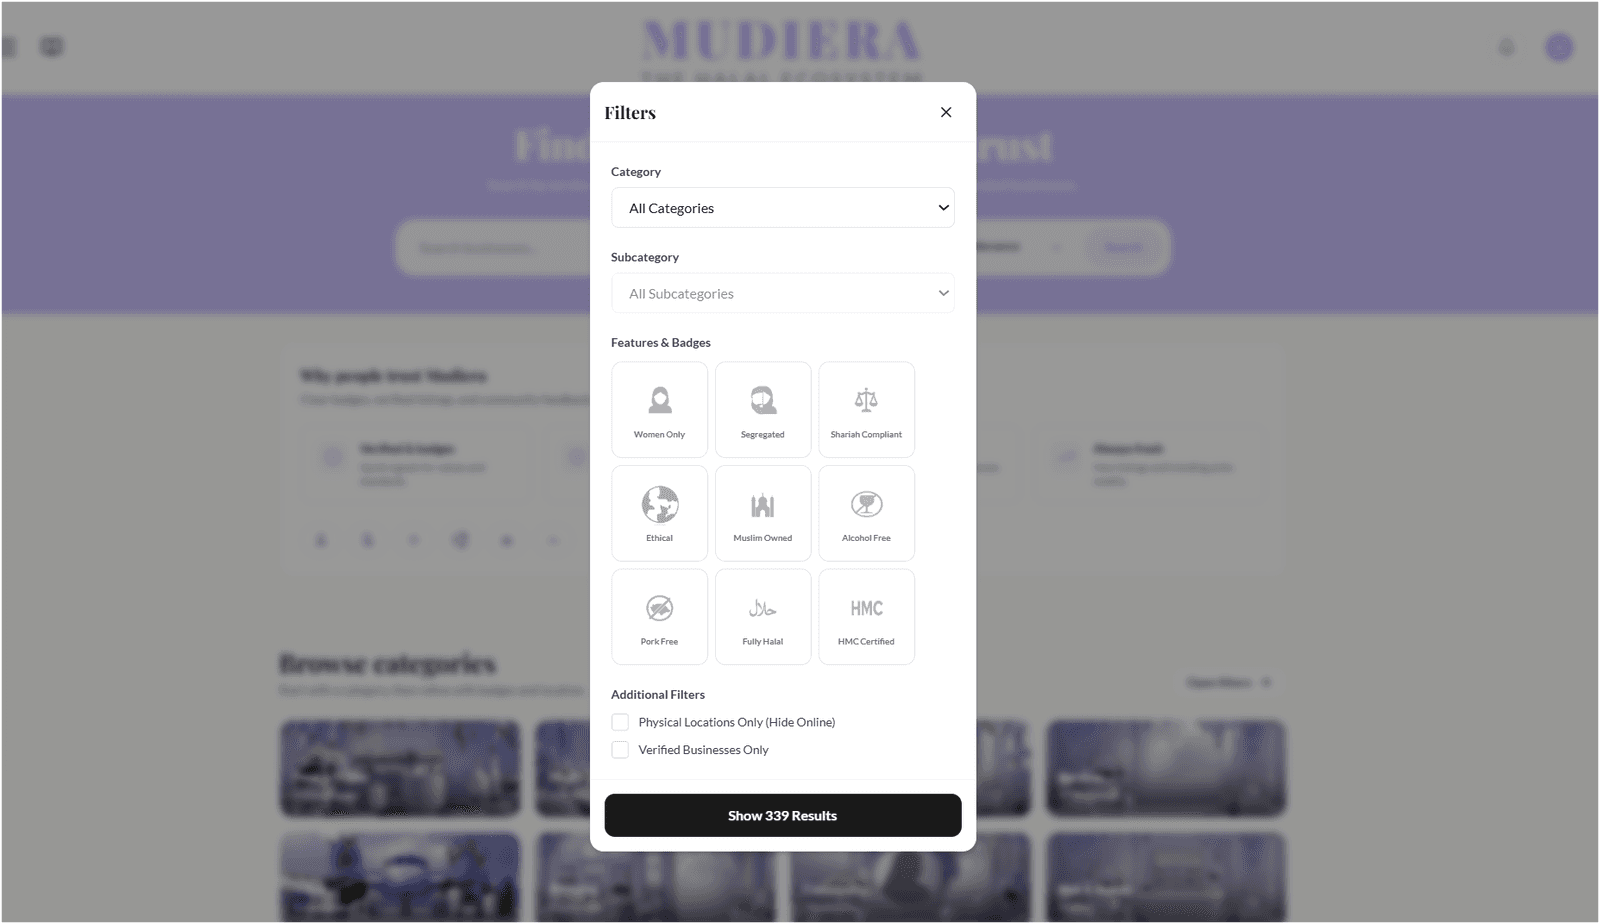
Directory tutorial: search, filters, and favourites
Directory The directory is your home for discovering businesses and services. Use search, filters, and favourites to build a shortlist you can come back to anytime. Search Keywords Search works best when you describe what you want in plain language. Start broad, then narrow down with a city or category. Try keywords like: name , category , city Example searches: hijab London , halal bakery , barber Birmingham Tip: if you get too many results, add a city or a more specific category. Filters + sorting Narrow results Filters help you narrow down fast. Sorting helps you decide what to open first (popular, highly rated, or newly added). 1 Open filters Tap Open filters . 2 Choose category and badges Pick a category, then add any badges that matter to you. Tip: start with one filter, then add more only if you still see too many options. 3 Sort your results Sort by Trending , Top rated , or New this week . Tip: use Top rated when you want proven favourites, and New this week to discover fresh businesses. Save favourites Shortlist If you find a business you like, save it so you can come back later without searching again. Tap the heart ♥ to save a business. Open your dashboard to see saved favourites anytime. Tip: favourites are great for comparing a few options before you message or book. What it looks like Here’s a quick preview of directory filters:

Create your account + profile
Create an Account Creating an account unlocks messaging, favourites, clubs, bookings, and your dashboard. It also lets you set up a profile so people can recognise you and find you easily. Sign up Takes 1 minute Start with your email and password. If email confirmation is enabled, you’ll be asked to verify before you can use all features. 1 Tap Sign up Tap Sign up from the header or menu. 2 Enter your details Enter your email and password, then submit. Tip: use a password you don’t reuse on other sites. 3 Confirm via email (if asked) If you’re prompted, open the email and confirm your account. If you can’t find it, check spam/junk and search your inbox for “Mudiera”. Set up your profile A good profile makes you easier to recognise in messaging and helps people trust that you’re real. You can always update this later. Username: pick something memorable — people will search it. Tip: avoid lots of numbers; keep it short and easy to spell. Avatar: add a photo or logo so you look real in messaging and blogs. Clear face photos or clean logos usually get the best response rates. Bio: 1–2 lines is enough. Example: “Modest fashion stylist in London — message for appointments.” Quick safety checklist These basics protect your account and help you spot suspicious activity quickly. Use a strong password. A mix of words or a password manager is ideal. Don’t share one‑time codes. Mudiera will never ask you to message or post verification codes. If something looks suspicious: log out and reset your password. Then sign back in and review your account settings. What it looks like Here’s a quick preview of profile setup:

Install Mudiera on your phone — 60 second setup
Quick tutorial Install Mudiera on Your Phone The best way to experience Mudiera is to install it on your phone like an app. Installing it gives you a home‑screen icon , faster loading, and a clean full‑screen layout that feels smooth and distraction‑free. Open mudiera.com Why install it? Once Mudiera is installed, it opens more quickly and behaves like a dedicated mobile app. This makes browsing, messaging, and booking feel more seamless and reliable. Below are two short walkthroughs. Pick your device and follow along once — you’ll be done in under a minute. Android Chrome On Android, Chrome can install Mudiera in seconds. When you’re finished, you’ll find Mudiera on your home screen like any other app. 1 Open Mudiera in Chrome Open Chrome, then tap the button below to load Mudiera. Open in Chrome 2 Tap the menu Tap the menu button in the top‑right corner. If you don’t see an install option right away, scroll the menu slightly. 3 Install Mudiera Choose Install app (or Add to Home screen , depending on your Chrome version). 4 Confirm Confirm the prompt. Mudiera will appear on your home screen and can be opened like a normal app. iPhone / iPad Safari iOS installs Mudiera through Safari’s Share menu. Make sure you open the site in Safari directly (not inside another app’s built‑in browser). 1 Open Mudiera in Safari Open Safari, then tap the button below to load Mudiera. Open in Safari 2 Tap Share Tap the Share button (square with an upward arrow). 3 Add to Home Screen Select Add to Home Screen , confirm, and you’ll see Mudiera on your home screen . If you don’t see an “Install” option This usually comes down to the browser you’re using or how the page was opened. Try these quick checks: Refresh once to reload any install UI. Make sure it’s HTTPS (secure sites install best). Use the right browser : Safari on iPhone, Chrome on Android. Tip: After installing, always open Mudiera from your home screen . This gives you the smoothest, fastest, and most consistent experience.
Brand & Business Mentions
No tagged businesses yet.
Reviews & Recommendations
Recommended
Recommended
Recommended